

- You don’t need expensive gym equipment — a few key tools like resistance bands, dumbbells, and a yoga mat can deliver a complete full-body workout at home.
- Beginners can get started for as little as $50–$100 by prioritizing versatile, compact equipment that works across multiple muscle groups.
- The right starting weight matters more than you think — picking dumbbells that are too heavy too soon is one of the most common beginner mistakes that leads to injury.
- A 10×10 foot space is all you need to set up an effective home workout area, even in a small apartment or bedroom.
- Consistency beats equipment every time — but choosing the right tools from the start makes it significantly easier to stick to a routine and see real results.
You Don’t Need a Full Gym to Get in Great Shape
Best Home Workout Equipment for Beginners
The right home workout equipment for beginners should be simple, affordable, and easy to use consistently. Most people overcomplicate starting a home fitness routine, assuming they need thousands of dollars in equipment before they can see results. They don’t. The truth is, a small, strategic collection of beginner-friendly tools can outperform a cluttered garage gym if you know how to use them. For those just getting started, Best Products for Men offers a straightforward breakdown of compact home gym equipment that removes the guesswork entirely.
The fitness industry makes billions convincing people they need more. But physical therapists, coaches, and experienced lifters consistently point back to the same handful of tools for building real strength and endurance at home.
Why Home Workouts Work for Beginners
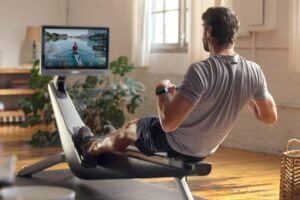
Home workouts remove almost every barrier that stops beginners from being consistent. There’s no commute, no membership fee, no waiting for equipment, and no feeling self-conscious in a crowded gym. When the friction disappears, the habit forms faster. Studies consistently show that convenience is one of the biggest predictors of long-term workout adherence — and nothing is more convenient than your living room.
How Little Space You Actually Need
A 10×10 foot area — roughly the size of a large bathroom — is genuinely enough to complete a full-body workout. You need enough room to lie flat, extend your arms overhead, and take a large step in any direction. That’s it.
Quick Space Check: Stand in the center of your workout area. Extend both arms out to the sides, then overhead. If you can do both without hitting a wall or furniture, you have enough space for 90% of beginner exercises including squats, lunges, push-ups, rows, and core work.
Even studio apartments can accommodate a dedicated fitness corner. Foldable mats, wall-mounted storage hooks, and stackable equipment make it easy to reclaim the space between sessions.
What You Can Realistically Achieve With Budget Equipment
With a resistance band set, a pair of dumbbells, and a yoga mat — a total investment that can come in under $100 — beginners can build real muscle, improve cardiovascular fitness, increase flexibility, and develop core strength. These aren’t shortcuts or compromises. They’re the same fundamental tools used by physical therapists for rehabilitation and by strength coaches for foundational training programs.
The Best Resistance Bands for Beginners
Resistance bands are arguably the single best starting point for any beginner building a home gym. They’re inexpensive, take up almost no space, and can be used to train every major muscle group in the body. A quality set costs between $15 and $40 and will last years with basic care. For more ideas on setting up your home gym, you can explore 10 of the best home gym equipment to consider.
What makes bands especially powerful for beginners is the concept of accommodating resistance — the band gets harder to pull as it stretches, which means the muscle is working hardest at the point where it’s strongest. This makes bands surprisingly effective for building strength, not just for warm-ups or stretching. For those interested in creating a versatile workout space, consider these tips for a small space home gym setup.
Loop Bands vs. Tube Bands: Which to Start With
| Band Type | Best For | Resistance Range | Beginner Pick |
|---|---|---|---|
| Loop Bands (Flat) | Lower body, glutes, mobility | 5–50+ lbs | Yes — start here |
| Tube Bands (with handles) | Upper body, rows, presses | 10–40 lbs | Yes — great addition |
| Heavy Thick Bands | Assisted pull-ups, deadlifts | 50–200 lbs | Add later |
Loop bands are flat, continuous circles of rubber that sit around your ankles, knees, or thighs during lower body work. They’re the go-to for glute activation exercises like clamshells, lateral walks, and banded squats. Tube bands, on the other hand, have handles at each end and are better suited for upper body movements like bicep curls, overhead presses, and seated rows.
For most beginners, starting with a loop band set that includes multiple resistance levels — typically color-coded from light to heavy — is the smartest first purchase. The Fit Simplify Resistance Loop Exercise Bands set is a well-regarded, affordable option that includes five resistance levels and comes with a carrying bag and instruction guide.
How Resistance Bands Replace Heavy Gym Equipment
A common misconception is that bands are only for warm-ups or physical therapy. In reality, a heavy resistance loop band can provide enough resistance to make exercises like squats, Romanian deadlifts, pull-aparts, and chest presses genuinely challenging — even for people who’ve been training for years. Pair a tube band with a door anchor attachment, and you’ve effectively replaced a cable machine.
The key is progressive overload — gradually increasing difficulty over time. With bands, you do this by moving to a higher resistance band, shortening the band’s length for more tension, slowing down the tempo of each rep, or combining bands for added resistance. Progress is completely achievable without ever touching a dumbbell.
Best Full-Body Exercises You Can Do With Bands
Bands shine because they adapt to nearly every movement pattern. For lower body training, banded squats, glute bridges, and lateral band walks are foundational. For upper body, seated rows using a tube band anchored around your feet, banded push-ups with the band across your upper back, and overhead tricep extensions are highly effective. Core work with bands — like banded Pallof presses and standing oblique crunches — adds rotational strength that bodyweight alone struggles to develop.
A complete full-body routine using only resistance bands might look like this:
- Banded Squat — 3 sets of 12 reps (loop band above knees)
- Seated Row — 3 sets of 10 reps (tube band anchored at foot level)
- Glute Bridge with Band — 3 sets of 15 reps (loop band above knees)
- Banded Push-Up — 3 sets of 8–10 reps (tube band across upper back)
- Pallof Press — 3 sets of 10 reps each side (tube band anchored at chest height)
- Lateral Band Walk — 3 sets of 12 steps each direction (loop band at ankles)
This routine hits every major muscle group and takes less than 30 minutes. For more on setting up a workout space, check out our small space home gym setup guide. No gym required.
Dumbbells: The Most Versatile Beginner Tool
If there’s one piece of equipment worth investing in first, it’s a pair of dumbbells. They bridge the gap between bodyweight training and barbell lifting, offering enough resistance to build meaningful strength while remaining simple, safe, and easy to use without a spotter or coach present. For more insights on setting up your home gym, check out the best home gym setup.
Adjustable Dumbbells vs. Fixed Weight Sets
Fixed weight dumbbells are simple and durable — you grab the weight you need and go. The downside is cost and space: a full set ranging from 5 lbs to 50 lbs can cost several hundred dollars and takes up significant floor space. For beginners working with limited space and budget, a single pair in the 10–20 lb range is often the smarter starting point.
Adjustable dumbbells, like the Bowflex SelectTech 552, solve the space problem by replacing up to 15 pairs of weights in a single compact unit. They adjust from 5 lbs to 52.5 lbs per dumbbell using a dial mechanism, making them ideal for progressive training as strength improves. The investment is higher upfront — typically $300–$400 for a quality pair — but the long-term value is significant for anyone serious about home training.
What Weight to Start With as a Beginner
Most beginners significantly overestimate the weight they need to start with. For women new to strength training, a starting range of 5–15 lbs covers the majority of upper body exercises and lighter lower body work. For men, 10–25 lbs is a practical beginner range that allows proper form development before chasing heavier loads.
A practical rule: choose a weight where the last two reps of a 10-rep set feel genuinely challenging but don’t break your form. If you can breeze through 12 reps without effort, go heavier. If your form collapses by rep 6, drop down. Getting this right from the start prevents the two most common beginner pitfalls — injury from going too heavy, and wasted sessions from going too light.
Why a Yoga Mat Is Non-Negotiable
A yoga mat isn’t just for yoga. It’s the foundation of every floor-based exercise in a home workout — from push-ups and planks to stretching and core work. Training directly on hardwood or tile is not only uncomfortable but genuinely increases injury risk, particularly for wrists, knees, and hips during ground contact movements. A quality mat like the Liforme Original Yoga Mat or the more budget-friendly Gaiam Essentials Thick Yoga Mat (5mm thickness) provides the grip, cushioning, and surface definition that makes every workout safer and more effective.
Kettlebells: One Tool, Total Body Workout
A single kettlebell can replace an entire rack of gym equipment when used correctly. Unlike dumbbells, the offset center of gravity in a kettlebell forces stabilizer muscles to engage throughout every movement, which means more muscles working simultaneously and more calories burned per exercise. For beginners looking to get maximum output from minimum equipment, a kettlebell is one of the smartest investments available. If you’re considering an upgrade, check out this guide on adjustable kettlebell assembly for more versatility in your workouts.
What makes kettlebells particularly effective for home training is how seamlessly they blend strength and cardio. A set of kettlebell swings elevates heart rate in the same way a sprint does, while simultaneously building posterior chain strength — the glutes, hamstrings, and lower back that most beginners neglect entirely. Ten minutes of kettlebell work done with intensity delivers a training effect that rivals a 30-minute treadmill session.
What Weight Kettlebell a Beginner Should Buy
Choosing the right starting weight is critical because kettlebell movements involve momentum and coordination that take time to develop. Going too heavy too soon doesn’t just risk injury — it grooves bad movement patterns that become harder to correct later. Most fitness professionals recommend women start with an 8kg (18 lb) kettlebell and men start with a 12kg (26 lb) kettlebell for foundational movements like swings, goblet squats, and deadlifts. For those with limited space, consider exploring a compact apartment workout setup to effectively incorporate kettlebells into your routine.
As a practical test before buying: pick up a weight at the store and perform a slow, controlled squat holding it at chest height. If your lower back rounds or your heels come off the floor, drop to the next weight down. The goal at the beginner stage is perfect mechanics, not impressive numbers. The AmazonBasics Cast Iron Kettlebell and the Kettlebell Kings Powder Coat Kettlebell are both well-regarded options with flat bases that prevent rolling and textured handles for a secure grip.
The Core Kettlebell Moves Every Beginner Should Learn
The kettlebell swing is the king of all kettlebell movements and the one to master first. It’s a hip-hinge pattern — not a squat — where the power comes from driving the hips forward explosively, not from pulling with the arms. Done correctly, it builds explosive glute strength, trains the entire posterior chain, and conditions the cardiovascular system simultaneously.
After the swing, the goblet squat is the next essential movement. Holding the kettlebell at chest height acts as a natural counterbalance that pulls beginners into a more upright, mechanically correct squat position than most people can achieve without it. It’s genuinely one of the fastest ways to teach proper squat form. From there, the kettlebell deadlift, single-arm row, and Turkish get-up round out a complete foundational toolkit that covers every major movement pattern.
Build your first kettlebell routine around these five movements and you have a complete program. For those looking to enhance their home workout setup, consider investing in compact apartment workout equipment to maximize your fitness routine.
Beginner Kettlebell Circuit (3 rounds, 40 seconds work / 20 seconds rest):
• Kettlebell Swing — Power through the hips, soft knees, flat back
• Goblet Squat — Kettlebell at chest, elbows inside knees at the bottom
• Single-Arm Row — Brace on a chair or bench, elbow drives back
• Kettlebell Deadlift — Hinge at hips, maintain neutral spine throughout
• Halo — Slow and controlled rotation around the head for shoulder mobilityRest 90 seconds between rounds. Complete 3 rounds total. Total time: approximately 20 minutes.
This circuit targets the posterior chain, legs, core, and upper back in a single session. Three sessions per week with this routine alone will produce noticeable strength and conditioning improvements within four to six weeks for most beginners. If you’re setting up a workout space at home, consider checking out this small space home gym setup guide for tips on optimizing your environment.
Exercise Ball: Strength, Balance, and Core in One
The stability ball — also called a Swiss ball or exercise ball — looks deceptively simple, but the unstable surface it provides forces your core to stay engaged during every single exercise performed on it. Wall squats using a stability ball, dumbbell chest presses performed while lying on the ball, and plank variations with feet elevated on the ball all become significantly more challenging and more effective than their flat-surface equivalents. Physical therapists use stability balls extensively in rehabilitation because of how effectively they activate deep stabilizing muscles that traditional exercises miss.
How to Pick the Right Size Exercise Ball
Sizing is straightforward and based on height. When seated on the ball with feet flat on the floor, your hips and knees should both form 90-degree angles. If your hips drop below your knees, the ball is too small. If your knees are significantly lower than your hips, it’s too large. As a general guide: people under 5’4″ should use a 55cm ball, those between 5’4″ and 5’11” need a 65cm ball, and anyone over 6’0″ should go with a 75cm ball. The Trideer Extra Thick Yoga Ball is a beginner-friendly option with a slow-deflate safety feature that prevents sudden collapse if punctured.
Double Duty as a Desk Chair
One underrated advantage of owning a stability ball is the ability to use it as a dynamic desk chair during the workday. Sitting on an unstable surface engages your core and encourages active posture instead of passive slouching, which can meaningfully reduce lower back discomfort associated with long hours of sitting. It won’t replace dedicated core training, but it adds low-level muscle activation throughout the day without any extra time commitment.
- Encourages upright posture by requiring constant micro-adjustments from core muscles
- Reduces pressure on the lumbar spine compared to traditional flat chairs
- Increases hip flexor mobility through gentle, ongoing movement while seated
- Burns slightly more calories than static sitting due to continuous balance engagement
- Doubles as workout equipment immediately before or after work without needing storage changes
The key is not to use the stability ball as your full-time chair from day one. Start with 20–30 minute sessions and alternate with a regular chair while your core adapts. Jumping straight into an 8-hour workday on the ball before your stabilizers are conditioned is a fast track to lower back fatigue.
For workouts, wall squats with a stability ball placed between your lower back and the wall are one of the most beginner-accessible lower body exercises available. The ball guides the movement, protects the lower back, and allows you to focus entirely on quad and glute engagement rather than balance. It’s an excellent stepping stone toward freestanding squats with additional weight.
Jump Rope: The Most Underrated Cardio Tool
A jump rope costs less than $15 and delivers one of the most effective cardiovascular workouts available at home. Ten minutes of continuous jump rope burns roughly the same number of calories as an 8-minute mile run, according to research published in exercise science literature — and it does it in a fraction of the space, with zero noise complaints from downstairs neighbors if you use a thin speed rope on a mat. For those looking to maximize their small space workouts, consider exploring our small space home gym setup guide.
For beginners, the Crossrope Get Lean Set is a popular entry point that includes two weighted ropes — a lighter rope for speed work and a heavier rope for building upper body endurance simultaneously. The weighted handles allow even beginners to feel the rhythm of the rope more easily, which dramatically shortens the learning curve. Budget-conscious beginners can also start with the Basic Garrelett Speed Jump Rope, which offers adjustable cable length and smooth ball-bearing handles at a fraction of the cost. For those looking to expand their home workout setup, consider exploring the best home gym equipment to complement your jump rope training.
Start with intervals rather than continuous jumping. Twenty seconds of jumping followed by 40 seconds of rest, repeated 8–10 times, is a beginner-appropriate Tabata-style cardio session that takes under 10 minutes and can be tacked on at the end of any strength workout. Progress by extending the work intervals, shortening the rest periods, or adding tricks like alternating feet or double-unders as coordination improves.
Pull-Up Bar: Upper Body Strength Without a Machine
Pull-ups are one of the most effective upper body exercises in existence — they build the back, biceps, shoulders, and core simultaneously using nothing but bodyweight. A doorframe pull-up bar brings that exercise into any home without drilling a single hole or dedicating permanent space. For under $40, it’s an exceptional return on investment for building functional upper body strength. For those interested in more fitness gear, check out these compact workout equipment essentials perfect for apartment living.
Doorframe Pull-Up Bars vs. Wall-Mounted Options
Doorframe pull-up bars, like the Iron Gym Total Upper Body Workout Bar, use leverage against the door frame to hold in place without hardware. They install and remove in seconds, making them ideal for renters or anyone who doesn’t want permanent fixtures. The trade-off is a weight limit — most doorframe bars support between 250 and 300 lbs — and some instability during kipping or dynamic movements. Wall-mounted bars like the Rogue Monster Utility Shelf or the Titan Fitness Wall-Mounted Pull-Up Bar are bolted directly into studs and support significantly more weight with zero flex, but require tools, wall space, and a commitment to keeping them in place. For most beginners, a doorframe bar is the right starting point.
Beginner Modifications if You Can’t Do a Full Pull-Up Yet
Most beginners can’t do a single full pull-up, and that’s completely normal. The path to your first pull-up runs through three key progressions: dead hangs to build grip strength and shoulder stability, Australian rows (also called inverted rows) using a lowered bar or table edge, and band-assisted pull-ups using a heavy resistance loop band looped over the bar and under your knee. Within 4–8 weeks of consistent practice using these progressions, most beginners achieve their first unassisted pull-up. The journey matters because each step builds real, functional strength rather than just practicing the final movement with compromised form.
How to Set Up Your Home Gym in a Small Space
The biggest mistake beginners make when setting up a home gym isn’t buying the wrong equipment — it’s not planning the space first. Equipment that doesn’t have a designated home gets pushed into a corner, forgotten, and eventually sold. Five minutes of intentional space planning before you buy a single item will save you money, frustration, and the slow death of a fitness routine buried under laundry. For more guidance, check out this article on the best home gym setup.
How to Organize Equipment That Packs Away Neatly
The goal is a setup that takes under two minutes to deploy and under two minutes to put away. Friction is the enemy of consistency — if getting your equipment out feels like a project, you’ll subconsciously avoid it. Resistance bands hang on a single hook or sit coiled in a small basket. Dumbbells sit on a compact two-tier dumbbell rack that slides under a bed or into a closet. A yoga mat rolls up vertically in a corner or hangs from a wall-mounted hook using its carrying strap. A jump rope coils into a jacket pocket. For more ideas, check out this small space home gym setup guide.
Vertical storage is your best friend in a small space. Wall-mounted hooks from a basic hardware store — installed into studs — can hold bands, jump ropes, yoga mats, and even light kettlebells in a space roughly 12 inches wide and 48 inches tall. For more ideas on setting up your home gym, check out the best home gym setup. That’s a storage footprint smaller than a standard doorway.
For people working in a shared living space like an apartment, a dedicated storage basket or canvas bin keeps all equipment in one portable location that can move from room to room. When workout time arrives, carry the basket to your workout area, complete your session, and return it to its home. It sounds simple because it is — and simple systems are the ones that actually get used.
- Resistance bands — store in a small zippered pouch or hang on a single wall hook
- Dumbbells — use a compact 2-tier rack, or store in a low cabinet or under a bed frame
- Yoga mat — roll vertically and lean in a corner or hang using its carry strap
- Kettlebell — store in a corner with a rubber mat underneath to protect flooring
- Stability ball — store in a large mesh ball holder or deflate slightly to tuck under a desk
- Jump rope — coil and hang on a hook or drop into a drawer or basket
- Pull-up bar — remove from doorframe and store upright in a closet corner
The Ideal Floor Space Required for a Full Workout
A 6×6 foot clearing is the absolute minimum needed to complete most beginner exercises safely. That covers a full push-up, a lying stretch, a standing squat, and a lateral lunge in every direction. A 10×10 foot space is more comfortable and opens up movement patterns like walking lunges, lateral band walks, and jump rope without constantly adjusting position. Measure your available floor area before buying any equipment — not after.
Flooring and Surface Tips to Avoid Injury
Hardwood and tile floors are slippery during high-intensity movement and unforgiving on joints during floor work. A quality yoga mat handles most of this problem for bodyweight and dumbbell training, but if you plan to use heavier kettlebells or do any jumping, an interlocking foam floor tile system provides significantly better protection for both your joints and your floor. The BalanceFrom Puzzle Exercise Mat with EVA Foam tiles is a practical, affordable option that covers an 8×8 foot area for around $40 and disassembles flat for storage.
Even on a mat, certain movements create lateral slip risk — particularly explosive lateral steps, jump landings, and resistance band exercises where the anchor point shifts. Wearing supportive, non-slip athletic shoes during these movements is the simplest solution. Cross-training shoes with a flat, wide base — like the Nike Metcon 9 or the Reebok Nano X3 — provide the grip and lateral support that running shoes with cushioned, rounded soles don’t offer during strength-based movement.
Build Your Beginner Workout Plan Around This Equipment
Having the right equipment is only half the equation. The other half is knowing how to structure it into a plan that produces consistent results without burning you out in the first two weeks. Most beginner programs fail not because of the exercises chosen, but because of poor programming — too much volume too soon, no recovery days, and no clear progression strategy. For more insight on setting up your home gym, check out this guide on the best home gym setup.
The most effective beginner approach follows a simple full-body training structure rather than the split routines popular in bodybuilding culture. Hitting every major muscle group two to three times per week produces faster strength and muscle gains for beginners than isolating muscle groups on separate days. This is because beginners benefit enormously from frequent practice of movement patterns while the nervous system is still learning to recruit muscles efficiently.
A Simple 3-Day Per Week Beginner Structure
Three training days per week with full rest or light activity on the remaining days is the gold standard for beginner programming. This frequency provides enough stimulus to drive adaptation while allowing full recovery between sessions — the window when actual muscle growth and strength development occur. Monday, Wednesday, and Friday is the classic structure, though any three non-consecutive days work equally well. For those looking to enhance their routine, consider incorporating home gym equipment to maximize your workouts.
Each session should follow the same basic architecture: a 5-minute warm-up, 20–30 minutes of strength work, and 5–10 minutes of cooldown stretching. The warm-up should include light movement that raises the heart rate — jumping jacks, arm circles, hip circles, and bodyweight squats — not static stretching, which is better saved for the cooldown when muscles are already warm. For those working out in limited space, consider exploring a small space home gym setup to optimize your workout area.
A complete beginner week using the equipment from this guide might look like this:
- Day 1 (Monday) — Lower Body Focus: Goblet squat, Romanian deadlift with dumbbells, banded glute bridge, lateral band walk, stability ball wall squat — 3 sets of 10–12 reps each
- Day 2 (Wednesday) — Upper Body Focus: Dumbbell shoulder press, banded seated row, push-ups, dumbbell bicep curl, resistance band tricep overhead extension — 3 sets of 10 reps each
- Day 3 (Friday) — Full Body & Core: Kettlebell swing, dumbbell reverse lunge, stability ball plank, banded Pallof press, jump rope intervals (20 seconds on, 40 seconds off × 8 rounds)
How to Progress Without Buying More Equipment
Progressive overload — the gradual increase of training stress over time — is what forces the body to keep adapting and getting stronger. Most beginners assume progression means buying heavier weights, but there are at least five other ways to make the same equipment harder without spending another dollar. Slowing down the tempo of each rep (especially the lowering phase), reducing rest time between sets, adding an extra set, increasing total reps, or shifting to a more challenging exercise variation all create new stimulus from the same tools. For those looking to optimize their workouts in limited space, consider a small space home gym setup to maximize efficiency.
Practical examples include progressing from a two-legged glute bridge to a single-leg glute bridge, from a standard push-up to an archer push-up, or from a static plank to a plank with alternating shoulder taps. With resistance bands, moving your grip point or shortening the band increases tension without changing bands. These micro-progressions add up significantly over weeks and months, driving adaptation long after the initial beginner gains plateau. For those working out in limited spaces, consider a small space home gym setup to maximize your workout potential.
Start Simple, Stay Consistent, and Build From There
The best home gym is the one you actually use. Start with three to four pieces of equipment — a resistance band set, a pair of dumbbells, a yoga mat, and one additional tool that matches your goals — and build a routine around them before you buy anything else. Consistency with simple tools will always outperform complexity with expensive ones. Show up three times a week, follow a structured plan, and focus on improving by 1% each session. That compounding effort is where real transformation happens.
Frequently Asked Questions
Beginners have a lot of questions before investing in home gym equipment, and that’s smart. Understanding what you’re buying and why before spending money prevents the common mistake of purchasing impressive-looking gear that doesn’t match your actual training needs. The answers below address the most common questions directly and practically.
Every question in this section reflects a real decision point beginners face. The goal isn’t to sell you on more equipment — it’s to help you make smarter choices with less.
What is the Most Important Piece of Home Workout Equipment for a Beginner?
A pair of dumbbells is the single most versatile starting point for most beginners. They bridge the gap between pure bodyweight training and machine-based gym work, they cover every major movement pattern, and they scale with you as strength improves by simply increasing the weight. If budget allows only one purchase, choose dumbbells in a weight range appropriate to your current strength level. For more information, check out this guide on the best home gym equipment.
That said, if budget is the primary concern, a resistance band set at $15–$40 delivers the broadest training coverage per dollar of any piece of home gym equipment available. Bands can train every muscle group, require zero floor space for storage, and can travel with you anywhere. They are not a lesser substitute — they are a legitimate training tool used by athletes and physical therapists alike.
How Much Should a Beginner Spend on Home Gym Equipment?
A functional beginner home gym can be built for $50–$150. A resistance band set runs $15–$40, a single pair of dumbbells costs $20–$60 depending on weight, and a quality yoga mat averages $25–$50. That combination covers the majority of beginner workout needs for months. Adding a kettlebell ($30–$60) and a jump rope ($10–$20) pushes the total to around $100–$200 for a genuinely comprehensive setup. You don’t need to spend more than that to get serious results as a beginner.
Can You Build Muscle With Just Resistance Bands and Dumbbells?
Yes — unequivocally. Muscle growth requires mechanical tension and metabolic stress, both of which resistance bands and dumbbells provide in abundance. Research consistently shows that training with lighter loads taken close to muscular failure produces equivalent hypertrophy to training with heavier loads. This means a set of banded Romanian deadlifts taken to near-failure builds comparable hamstring and glute mass to a barbell version, provided effort levels are matched.
The key variable is not the tool — it’s the effort applied to it. Beginners who train consistently with bands and dumbbells, apply progressive overload over time, and support their training with adequate protein intake (targeting roughly 0.7–1g of protein per pound of bodyweight daily) will build visible, functional muscle. The evidence is clear and the approach is proven.
How Much Space Do You Need for a Home Gym?
A minimum of 6×6 feet of clear floor space is sufficient for most beginner workout programs. A 10×10 foot area is more comfortable and accommodates a wider range of movements including walking lunges, jump rope, and lateral drills. You do not need a dedicated room. A cleared section of a bedroom, living room, or garage works equally well — the key is that the space is consistently available and free of furniture hazards during training.
How Often Should Beginners Work Out at Home?
Three days per week is the optimal starting frequency for most beginners. This provides enough training stimulus to trigger consistent strength and conditioning adaptations while allowing 48 hours of recovery between sessions — the minimum window needed for muscle repair and growth to occur. Beginning with more frequent sessions before the body has adapted is a leading cause of beginner burnout and overuse injuries.
After 6–8 weeks of consistent three-day training, many beginners naturally want to add a fourth session. This is a healthy sign of adaptation and can be introduced gradually by adding one additional day of lighter activity — mobility work, a longer jump rope session, or a full-body circuit at reduced intensity. The fourth day should complement, not duplicate, the primary training sessions.
The most important thing is simply starting. Three 20-minute sessions per week done consistently for 90 days will produce more visible results than an elaborate 6-day program followed inconsistently for two weeks. Build the habit first, then build the intensity around it.
For beginners looking to start working out at home, choosing the right equipment can be a daunting task. It’s important to select gear that is not only effective but also compact and suitable for your living space. To help you get started, consider checking out this guide to the best home gym equipment that is both space-efficient and beginner-friendly. By investing in the right tools, you can create a workout routine that fits your lifestyle and helps you achieve your fitness goals.
Leave a Reply